
Bumper scuff removal is the process of eliminating surface marks, paint transfer, abrasion damage, and shallow deformations from a vehicle’s bumper — restoring its original finish without replacing the entire panel. Most minor bumper scuffs can be fixed at home in under an hour using a polishing compound and a microfiber cloth. Deeper damage that cuts through the clear coat or base coat, however, requires professional refinishing for a factory-matched, invisible result.
Quick Answer
Bumper scuff removal means eliminating surface-level marks from your bumper using abrasive polish, heat, touch-up paint, or professional refinishing — depending on how deep the damage goes. Surface scuffs respond beautifully to DIY methods costing under $30. Anything that cuts into the color layer or breaks the plastic needs a body shop with computer-matched paint systems.
This guide covers every method — from the fingernail test to heat gun techniques to professional respray — and goes further by explaining exactly what repair options are available, how much each costs, how long each takes, and which products actually work versus which are overhyped myths. Whether your bumper picked up a parking lot kiss, scraped a concrete pillar, or made contact with another vehicle, you will find the right fix here.
What Is Bumper Scuff Removal?
Bumper scuff removal is a targeted repair process that addresses damage confined to the outermost layers of a bumper’s finish. Modern vehicle bumpers are made from flexible thermoplastic polymers — most commonly polypropylene or TPO (thermoplastic olefin), a blend of plastic and rubber — coated with primer, base coat paint, and a protective clear coat layer. In most cases, a scuff affects only the clear coat or the very top of the base coat, which is why so many scuffs can be corrected without repainting the entire bumper.
It is critical to distinguish between a scuff and a scratch. A scuff is typically shallow — often just displaced or transferred material sitting on top of your paint. A scratch, in contrast, cuts into the surface itself. Many marks that look alarming are simply rubber or paint transfer from another object resting on your clear coat, meaning they wipe away with the right product and a bit of elbow grease.
Understanding this distinction is the single most important first step. Treating a Level 1 surface scuff like a deep scratch wastes time and removes more clear coat than necessary. Treating a deep scratch like a surface scuff leaves the damage exposed to moisture, oxidation, and accelerated deterioration.
The Layered Structure of Your Bumper’s Paint System
To repair a bumper scuff effectively, it helps to understand what you’re working with. From the outside in, a modern painted bumper has four distinct layers:
A transparent protective layer approximately 50–75 microns thick. Most light scuffs live here. This is the layer targeted by polishing compounds.
Contains the pigment that gives your bumper its color. When a scuff reaches this layer, you will see visible discoloration or a lighter patch. Touch-up paint or professional respray is needed.
Provides adhesion between the plastic substrate and the paint layers. If your scuff exposes grey or off-white primer, the damage is significant.
The flexible thermoplastic bumper body itself. Damage here means structural or deep cosmetic repair is required — this is beyond DIY territory.

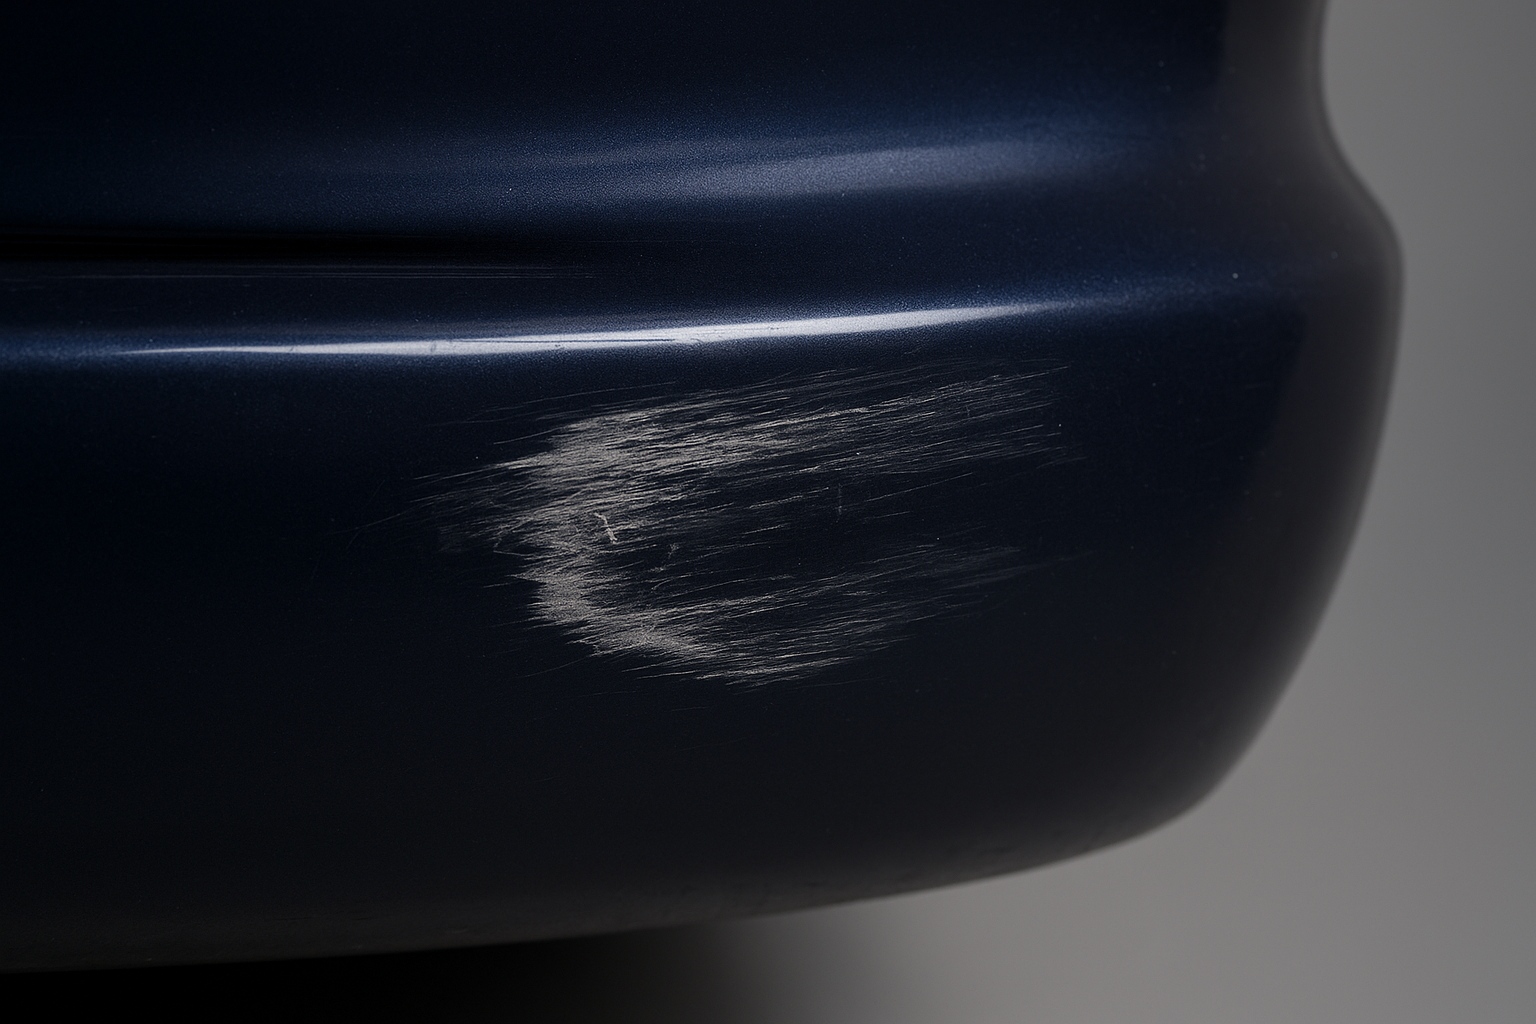
A typical bumper scuff showing surface paint transfer — the most common type of damage addressed by bumper scuff removal techniques.
Assessing the Damage: The Fingernail Test and 4 Scuff Levels
Before reaching for any product, assess the damage accurately. The most reliable first test costs nothing: run your fingernail across the mark. If your nail glides over it without catching, the scuff is surface-level and highly fixable at home. If your nail catches in a groove, the clear coat or paint has been broken — and the repair becomes more involved.
Beyond the nail test, examine the scuff under direct sunlight from multiple angles. Surface contamination looks like a discoloration that doesn’t seem to have depth. A clear coat scuff looks like a hazy or milky patch. Base coat damage shows actual color change or a lighter spot. Structural damage is obvious — you will see cracks, splits, raised ridges, or deformation in the plastic itself.
Surface Contamination
What it looks like: Foreign material — rubber, paint from another car, road tar — sitting on top of your clear coat. No actual damage to your paint layers beneath.
Nail test result: Smooth — nail glides with no catch whatsoever.
Typical cause: Car park contact, rubber bumper strips on other vehicles, trolley impacts.
Fix: Detailing clay bar, bug-and-tar remover, or light polishing compound. Easiest, fastest, and cheapest repair — often under 20 minutes.
Clear Coat Scuff
What it looks like: Light abrasion or haziness within the clear coat only. The color beneath appears correct but the surface looks dull, milky, or scratched.
Nail test result: Slight catch — fingernail finds a faint groove.
Typical cause: Concrete pillar scrape, low-speed parking contact, hedge or fence brush.
Fix: Polishing compound applied by hand or with a dual-action polisher. Two to three passes typically produce excellent, near-invisible results.
Base Coat Damage
What it looks like: Damage has penetrated the clear coat into the color layer. Visible discoloration, a lighter patch, or exposed primer is present. If you’re also dealing with dents, see our bumper dent repair guide for dent-specific methods.
Nail test result: Definite catch — noticeable groove in the paint surface.
Typical cause: Moderate-speed impacts, significant scrapes against hard objects, heavy paint transfer from another vehicle.
Fix: Touch-up paint pen followed by clear coat for very small areas. Professional respray for anything larger than a 50p coin for a seamless result.
Structural Damage
What it looks like: Cracking, splits, deep gouges, raised ridges, or visible deformation of the bumper plastic itself. The bumper may flex or sag abnormally.
Nail test result: Irrelevant — the damage is structural, not cosmetic. For information on structural fixes and reinforcement, see bumper reinforcement.
Typical cause: Higher-speed impacts, reversing into a post or wall, collision damage.
Fix: Professional auto body repair or full bumper replacement. Do not attempt DIY on structural damage — the result will be unsafe and visually obvious.
DIY Bumper Scuff Removal: Complete Step-by-Step Method
For Level 1 and Level 2 damage, a careful DIY approach produces excellent, near-professional results. The total product cost is typically under $30 — a fraction of any shop estimate. This process works whether you are dealing with a fresh rubber scuff from a car park, paint transfer from another vehicle, or a hazy clear coat abrasion from a concrete pillar.
What You Will Need
-
✓
Car wash soap and a wash mitt (two-bucket wash method preferred) -
✓
Isopropyl alcohol (70% or higher) in a spray bottle -
✓
Scratch removal or polishing compound (e.g., Meguiar’s ScratchX 2.0, 3M Scratch Remover, or Chemical Guys VSS) -
✓
Three or more clean microfiber cloths — never reuse a cloth that has touched compound on a fresh section of paint -
✓
Finishing polish — finer than compound; removes micro-scratches left behind by the abrasive stage -
✓
Detailing clay bar (optional but recommended for Level 1 surface contamination) -
✓
Car wax or paint sealant for final protection — do not skip this step
The 6-Step Bumper Scuff Removal Process
-
1
Wash and Dry the Entire Bumper Thoroughly
Clean the bumper with car wash soap and warm water using a two-bucket method — one bucket for soapy water, one for rinsing your mitt. Remove all dirt, road grime, bug splatter, and loose debris completely. Dry with a clean microfiber cloth. Working on a dirty surface is the single biggest DIY mistake — grit pressed into the paint by your compound will create fresh scratches while you try to remove the original scuff.
-
2
Degrease with Isopropyl Alcohol
Wipe the scuffed area with isopropyl alcohol on a clean cloth. This removes wax, polish residue, and surface oils that would prevent your compound from bonding and working effectively. Allow 60 seconds for the alcohol to fully evaporate before moving forward. Wax contamination reduces compound effectiveness by as much as 50% — this step is not optional.
-
3
Apply Scratch Removal Compound with Overlapping Circular Passes
Apply a pea-sized amount of scratch removal compound to a clean microfiber cloth or foam applicator pad. Work it into the scuffed area using firm, overlapping circular motions, applying consistent pressure — not aggressive scrubbing. Work in a 6-inch radius around the scuff to avoid creating a polished halo that looks obvious in direct sunlight. For Level 1 surface contamination, a single pass usually suffices. For Level 2 clear coat scuffs, expect two to three passes. Reload with fresh compound for each pass.
-
4
Buff Away Residue and Inspect in Natural Daylight
Wipe away compound residue with a fresh, clean microfiber cloth using light, straight strokes. Inspect the area in natural daylight from multiple angles — indoor lighting masks remaining hazing and swirl marks that will be obvious in sunlight. If the scuff is still visible, repeat Step 3. Most clear coat scuffs require two to three passes total. Patience at this stage delivers a substantially better final result.
-
5
Apply Finishing Polish to Remove Compound Micro-Scratches
Once the scuff is gone, apply a finer finishing polish using a fresh microfiber cloth. This step removes the microscopic surface scratches left behind by the abrasive compound, restoring full gloss and depth to the clear coat. This is what separates a professional-looking DIY result from one that still looks slightly hazy in raking light.
-
6
Seal with Car Wax or Paint Sealant
Apply a quality car wax or synthetic paint sealant over the repaired area and blend it into the surrounding paint. This seals the newly exposed clear coat, blends the repaired area with adjacent paint, and protects against UV damage and oxidation. Skipping the wax leaves your freshly compounded clear coat unprotected — it will oxidize and dull faster than the surrounding, sealed paint.
💡 Pro Tip
Do the full repair in shade — never in direct sunlight. Sunlight causes compound to dry too quickly before it can do its work, and it makes it almost impossible to accurately assess the repair until you move the car into different light. Ideal temperature range is 60–80°F (15–27°C).
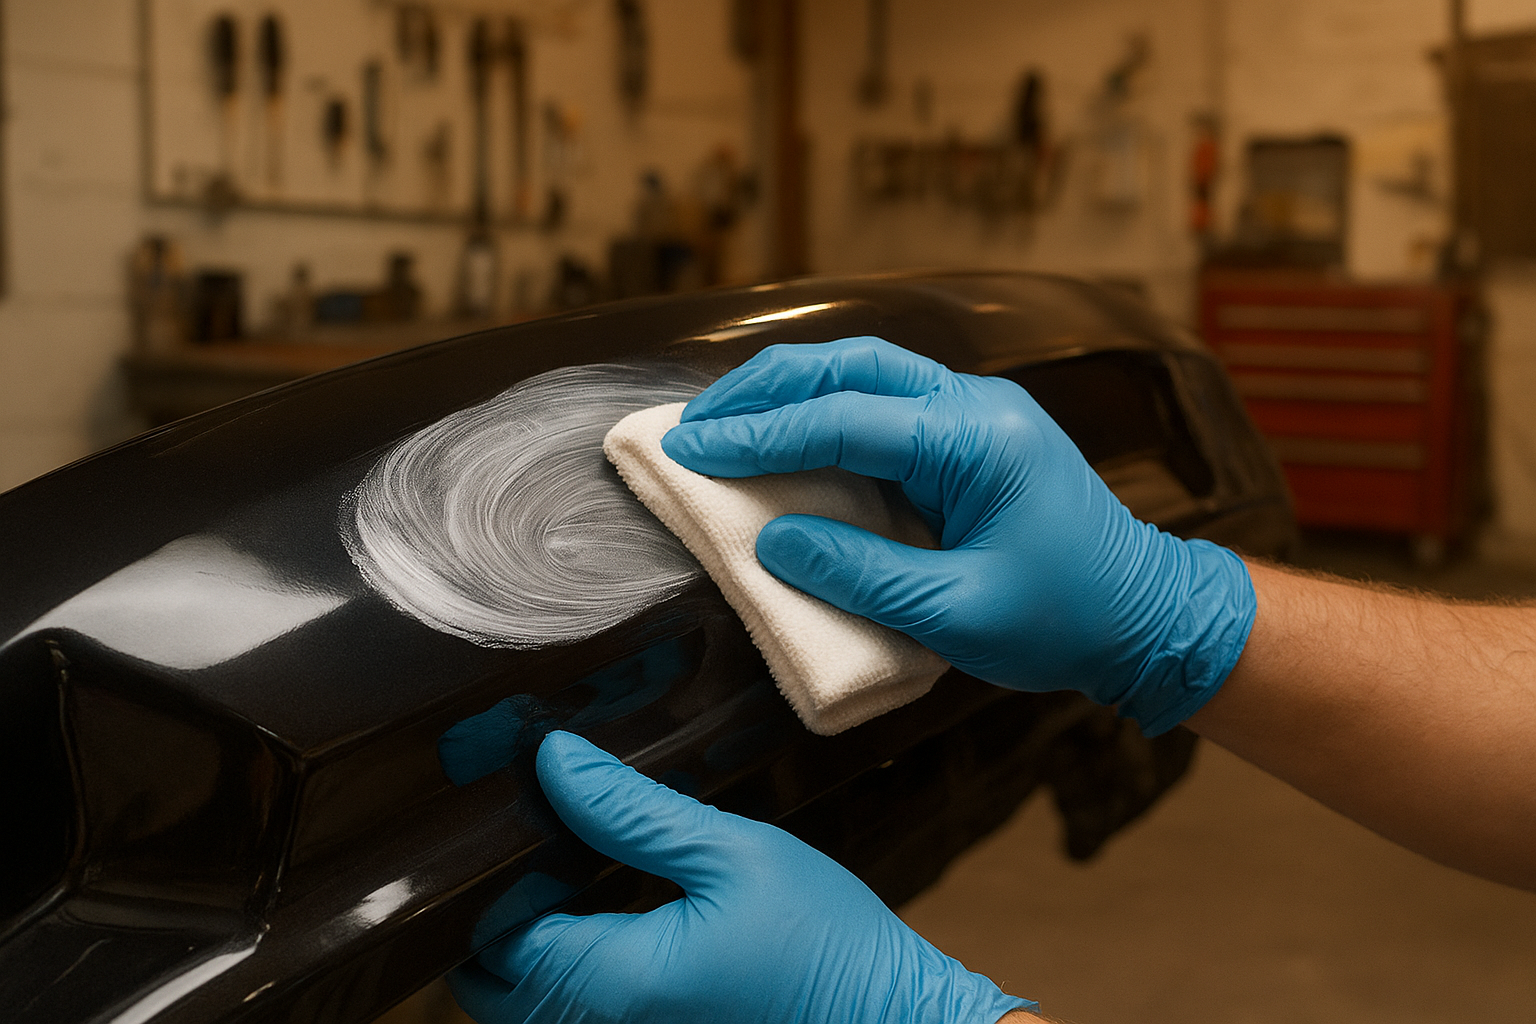
Applying polishing compound by hand is an effective first step in DIY bumper scuff removal for surface-level and clear coat damage.
Using a Heat Gun for Bumper Scuff Removal
One technique that surprises many car owners: using a heat gun — or even a hair dryer — on plastic bumper scuffs. Because thermoplastic bumpers have shape memory (the ability to return toward their original form when gently warmed), minor surface deformations sometimes respond dramatically well to controlled heat application. This method works particularly well on bumpers that have been pushed in or raised by a light impact.
How to Apply Heat Correctly
Hold a heat gun 6 to 8 inches from the scuffed area and move it in slow, sweeping passes — never stopping in one spot for more than two seconds. As the plastic warms, use a clean microfiber cloth to gently smooth the surface with circular strokes in the direction of the original contour. A hair dryer set to high heat works similarly but takes considerably longer — expect two to three times the time investment. This technique is most effective on scuffs that have caused the plastic to slightly distort, raise, or dimple inward.
⚠ Important Caution
Excessive heat will blister or permanently warp your paint and bumper plastic — this damage cannot be undone without a professional respray. Always use the lowest effective heat setting, keep the gun moving constantly, and test on a small hidden area first. If you are unsure or uncomfortable with heat tools, skip this technique entirely and use polishing compound — it carries far less risk and still delivers excellent results for most scuffs.
When Heat Works — and When It Doesn’t
Heat works best when: the bumper plastic has been raised, dimpled, or slightly pushed in, and the paint is still largely intact. For example, a low-speed car park bump that left a raised plastic ridge but minimal paint loss responds very well to heat alone.
Heat does not work when: the scuff has removed paint entirely, created deep grooves, or cracked the plastic substrate. In these cases you still need to restore the color layer via touch-up paint or professional refinishing. Always combine the heat technique with compound polishing for the best overall result on light-to-moderate damage.
Best Products for Bumper Scuff Removal
Choosing the right product matters enormously. Using too aggressive a compound on a light surface scuff removes more clear coat than necessary. Using too mild a polish on a deep scuff simply won’t produce any improvement. Here is a full breakdown by damage level, including what to avoid:
For Level 1 — Surface Contamination
-
▶
Detailing clay bar — lifts rubber, tar, and paint transfer from the clear coat surface without abrading it. The gold standard for paint transfer removal. -
▶
Bug and tar remover spray — dissolves adhesive contamination and rubber transfer chemically, without any mechanical scrubbing that could scratch. -
▶
Light polishing compound — sufficient for removing rubber scuff marks from parking incidents where the clear coat itself is still smooth.
For Level 2 — Clear Coat Scuff
-
▶
Meguiar’s ScratchX 2.0 — a mid-level abrasive that handles most clear coat scuffs without being overly aggressive. Widely available and consistently reliable. -
▶
3M Scratch Remover — reliable on shallow clear coat abrasions, available at most auto parts stores, works well both by hand and machine. -
▶
Chemical Guys VSS Scratch and Swirl Remover — versatile formula suited for both hand and dual-action machine polisher application. -
▶
Turtle Wax Scratch Repair Kit — a budget-friendly all-in-one option that includes compound, polish, and wax in a single kit, ideal for first-time DIY repairs.
Products to Avoid for Bumper Scuff Removal
Not every product marketed for scuff removal actually works — and some actively make the problem worse:
-
✗
Toothpaste — mildly abrasive and can improve very light clear coat hazing, but it is not effective for paint transfer or deeper damage. Leaves residue that attracts water spots. Not a reliable solution. -
✗
WD-40 — temporarily masks light scuffs by filling micro-abrasions but does not remove damage. Attracts dirt, degrades wax protection, and leaves a greasy film that complicates future compound work. -
✗
Household abrasive cleaners (e.g., Brasso, Ajax) — these are far too aggressive for automotive clear coat and will cause irreversible surface damage.
Machine vs. Hand Application: Which Is Better?
A dual-action (DA) polisher — an orbital polishing machine that simultaneously rotates and oscillates — delivers faster, more consistent results than hand application for Level 2 scuffs and produces less heat than a rotary polisher, making it far safer for DIY use. However, a DA polisher is not required. Hand polishing with a microfiber applicator pad produces excellent results if you apply sufficient pressure and use overlapping passes systematically.
Above all: do not rush. Multiple lighter passes beat one aggressive session that removes too much clear coat. Clear coat is finite — once you have polished through it, repainting is the only option.
Professional Bumper Scuff Removal: What to Expect
DIY methods are genuinely effective for surface-level damage. However, there are clear situations where professional auto body repair is the correct decision. Attempting to fix Level 3 or Level 4 damage without professional tools typically results in a worse outcome — mismatched paint, visible repair lines, or accelerated clear coat removal that leads to oxidation and bubbling.
When to See a Professional
Consult a professional auto body shop when you notice any of the following:
-
●
The scuff has broken through to bare primer or plastic — the color layer is visibly missing in any section -
●
Heavy paint transfer from another vehicle covers a large area and multiple compound passes have not resolved it -
●
The bumper has visible cracks, splits, raised ridges, or structural deformation of the plastic -
●
Your vehicle has a specialty finish — matte, satin, pearl, tri-coat, or custom color — requiring precise factory paint matching -
●
The scuff spans multiple panels or extends to a body line — professional blending is required for an invisible result -
●
Multiple DIY compound attempts have failed to restore the surface appearance -
●
The scuff is on a newer, higher-value vehicle where a factory-perfect finish is not negotiable
What Professional Bumper Scuff Repair Involves
A qualified auto body shop has access to capabilities that no DIY kit can replicate:
Professional shops use your vehicle’s factory paint code (found on a sticker in the door jamb or under the bonnet) combined with spectrophotometer analysis to mix a color indistinguishable from the original. DIY touch-up pens, even when correctly coded, often have a perceptible colour difference in direct light.
Professional spray booths maintain controlled temperature, humidity, and airflow — eliminating the dust contamination that causes gritty, orange-peel finishes in amateur spray jobs. The finish that emerges is factory-smooth and UV-cured.
Skilled technicians can blend the repaired area into adjacent panels — fading the new paint into the existing paint in a way that makes the repair genuinely invisible even in direct sunlight. This is impossible to replicate at home.
For scuffs that don’t require a full bumper respray, many professional shops offer SMART repair — a faster, more affordable spot repair technique targeting only the damaged area. Turnaround is often the same day or next day, and cost is significantly lower than a full panel respray.
For residents in Southern California, Brea Auto Body offers professional bumper repair and refinishing with factory-quality results — including computer colour matching, clear coat respray, colour blending, and structural bumper repair.
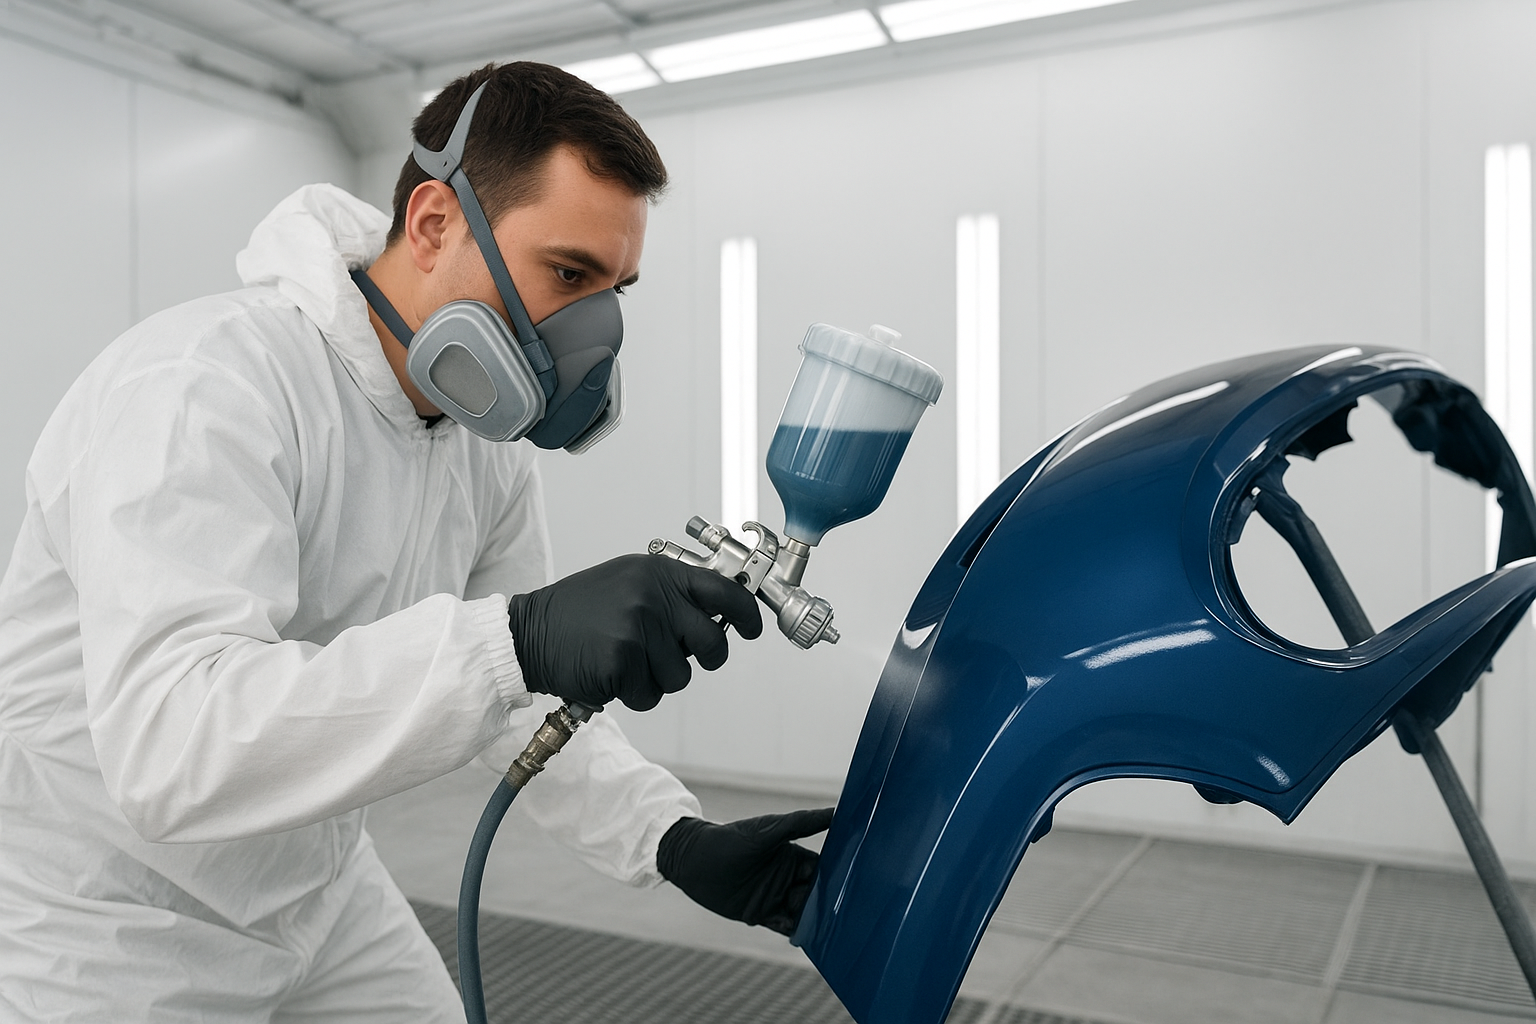
Professional bumper refinishing in a controlled spray booth delivers results that DIY bumper scuff removal methods cannot match for deep or large-area damage. Learn more in our bumper repair guide for when replacement or respray is recommended.
How Much Does Bumper Scuff Removal Cost?
Cost is one of the first questions people ask — and it varies significantly depending on damage level, paint type, location, and whether you go DIY or professional. Here is a comprehensive breakdown:
Factors That Affect Professional Repair Cost
-
›
Paint type: Metallic, pearl, and tri-coat finishes require more precise mixing and additional coats — expect 20–40% higher cost than solid colours. -
›
Scuff size and location: A scuff near a body line or panel edge requires blending into the adjacent panel, adding labour time and cost. -
›
Vehicle age and paint fade: Older vehicles often have faded paint that makes new paint application visible even with good colour matching — the entire bumper may need to be resprayed. -
›
Geographic location: Labour rates vary significantly — urban areas typically charge 30–50% more than suburban or rural shops for the same repair.
Will Insurance Cover Bumper Scuff Repair?
Comprehensive or collision coverage may cover bumper scuff repair depending on how the damage occurred and your deductible amount. For minor scuffs where the repair cost is close to or below your deductible, paying out of pocket is almost always more economical than filing a claim that may affect your premium at renewal.
As a general rule: if the repair cost is less than your deductible, or less than the expected premium increase over the next two renewal periods, handle it privately. Always get two or three professional estimates before deciding. Some shops offer free written estimates without obligation.
Bumper Scuff Removal for Specific Situations
Different types of bumper scuffs require slightly different approaches. Here is how to handle the most common specific scenarios:
Removing Paint Transfer from Another Car
Paint transfer — where another vehicle’s paint has deposited onto your bumper — looks alarming but is often one of the easiest scuffs to remove. Because the foreign paint is sitting on top of your clear coat rather than in it, a clay bar or detailing solvent often removes it without any abrasive compound at all. Start with a clay bar lubricated with detailing spray. If the transfer remains, escalate to a light polishing compound. Only move to a heavier compound if lighter approaches fail — you want to remove the foreign material, not your own clear coat.
Removing Scuffs from Black Plastic Bumpers
Some vehicles — particularly older models and many SUVs — have unpainted black plastic bumpers or trim panels. These do not respond to polishing compound because there is no clear coat to work with. For unpainted black plastic, the options are: a specialist plastic restorer product (such as Meguiar’s Ultimate Black or similar), a heat gun application to restore the original texture, or bumper black spray if the plastic has gone grey and dull from UV exposure. Note that standard scratch removal compounds intended for painted surfaces will create a white residue on unpainted black plastic that is difficult to remove.
Removing Scuffs from Matte or Satin Finish Bumpers
Matte and satin factory finishes require special treatment. Do not use standard polishing compounds on matte paint — the abrasive action will create glossy spots that are permanent and impossible to reverse without a full respray. For matte bumpers, use only products specifically formulated for matte finishes, and consult a professional body shop before attempting any DIY repair. This is one situation where professional repair is almost always the right call from the outset.
Dealing with Scuffs on Older or High-Mileage Vehicles
On vehicles over 8–10 years old, the clear coat may already be thinning from years of UV exposure and washing. Before compounding heavily, assess whether the surrounding clear coat is in good condition. If the paint around the scuff already looks faded, chalky, or is peeling, aggressive compounding may accelerate clear coat failure. In this case, a professional assessment of the overall paint condition first is the smarter approach.
Preventing Future Bumper Scuffs
The most cost-effective approach to bumper scuff removal is reducing how often you need it. A few consistent habits make a measurable difference — and some protective products eliminate the problem almost entirely.
-
TIP
Apply paint protection film (PPF) to your bumpers. PPF is a transparent, self-healing thermoplastic urethane film that absorbs light contact without transferring damage to your paint underneath. Modern PPF has a self-healing top coat that causes light surface marks to disappear with gentle heat. It is the single most effective physical protection available for bumpers — far superior to any wax or sealant. -
TIP
Consider a professional ceramic coating for your bumpers. Ceramic coatings (liquid polymer sealants that permanently bond to the paint surface) create a significantly harder, hydrophobic surface layer. Light contact is less likely to leave a mark, and any contamination that does land on the surface is far easier to remove without abrasion. -
TIP
Park at the end of rows in car parks. End-of-row spots expose only one side of your vehicle to passing cars and shopping trolleys — this single habit eliminates a significant share of car park scuffs. -
TIP
Use parking sensors or a reversing camera when manoeuvring in tight spaces. The majority of bumper scuffs occur during low-speed parking — proximity sensors provide real-time distance feedback that dramatically reduces the risk of bumper contact. -
TIP
Install removable bumper guard strips. Transparent or colour-matched rubber or silicone bumper guards peel onto your bumper and take the impact of minor contacts — they can be replaced cheaply when worn rather than repairing paint damage. -
TIP
Wax or seal your bumpers every 3–4 months. A maintained wax or sealant layer means light contact often wipes clean without leaving a mark on the underlying paint — and it makes bird droppings, tree sap, and bug splatter far easier to remove before they etch into the clear coat.
Frequently Asked Questions About Bumper Scuff Removal
Conclusion
Bumper Scuff Removal: Match the Method to the Damage
Effective bumper scuff removal always starts with an honest, accurate assessment of your damage level. Surface contamination and clear coat scuffs — the vast majority of bumper marks people encounter — respond beautifully to a methodical DIY compound approach. In most cases, car owners achieve near-invisible results in under 90 minutes at a total product cost under $30. Deeper damage, specialty finishes, matte paint, structural issues, and large-area paint loss are best left to professionals with computer-matched paint systems, controlled spray booths, and the skill to blend repairs seamlessly.
Whether you tackle it yourself with a polishing compound or visit a trusted shop like Brea Auto Body, act quickly — fresh scuffs are always easier and cheaper to address than ones left to oxidise, accumulate contamination, or develop into larger paint failures. And invest in prevention: paint protection film, regular waxing, careful parking choices, and parking sensors together mean spending far less time and money on bumper scuff removal in the years ahead.

