

Headlight Restoration: How to Get Crystal-Clear Lenses and Safer Night Driving in Brea, CA
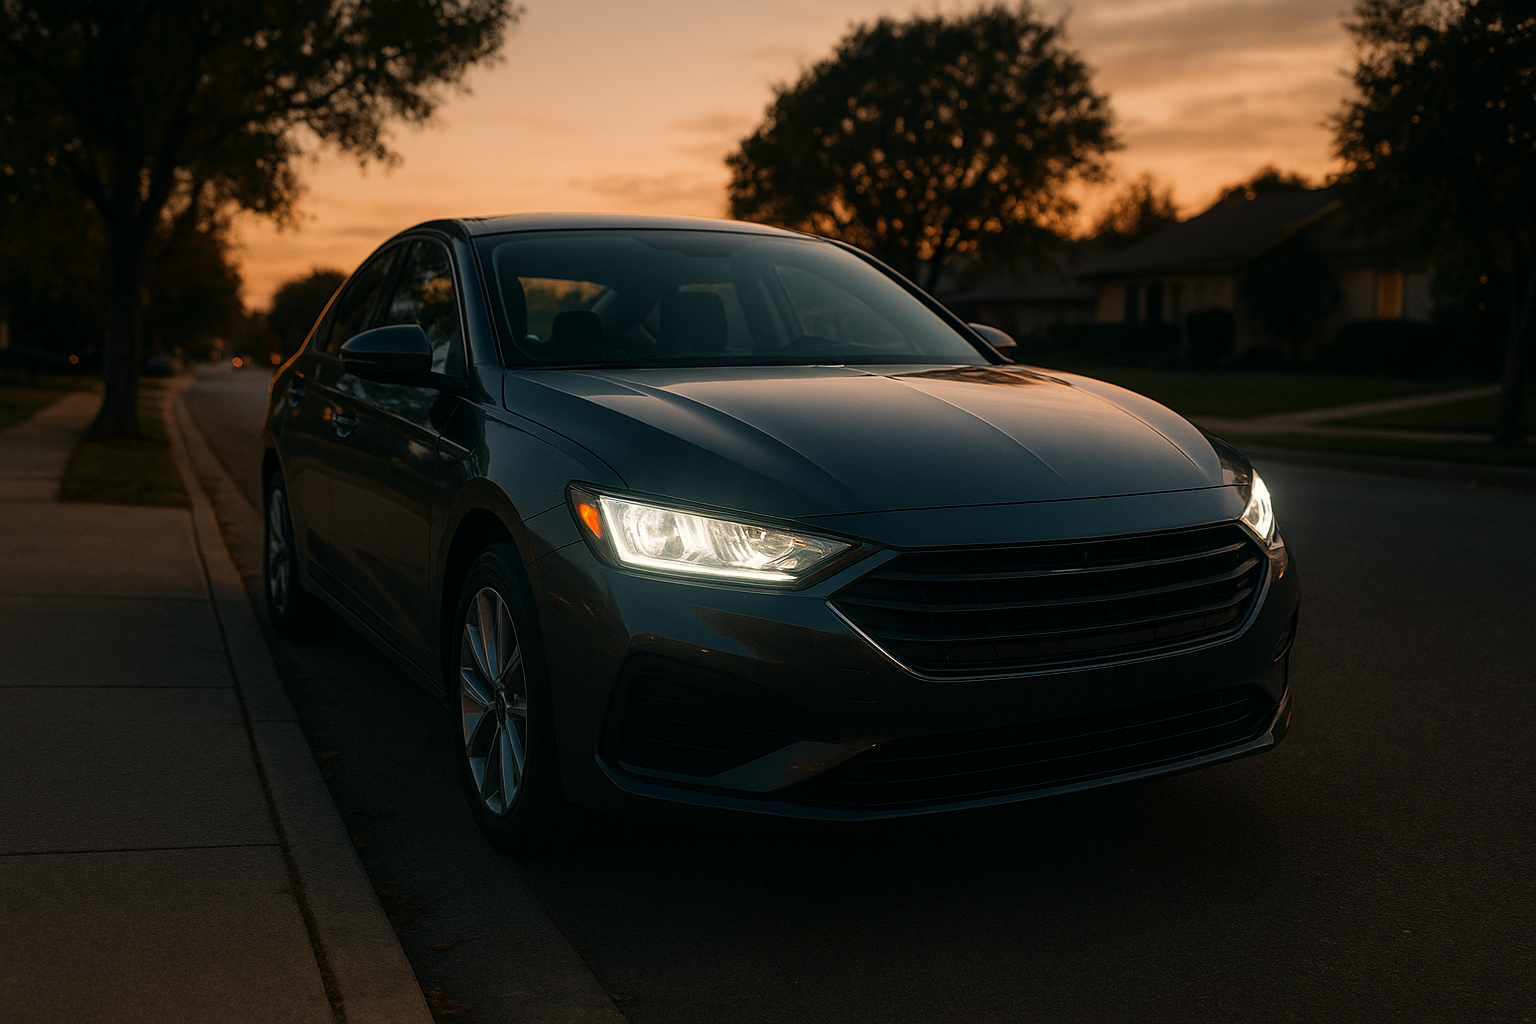
Professional headlight restoration brings back clarity, style, and nighttime confidence.
If your headlights look cloudy, yellowed, or hazy, you’re not alone. Sunlight, road grime, and time all degrade polycarbonate headlamp lenses. The good news: headlight restoration can reverse the damage, improving visibility, safety, and curb appeal. In this guide, we’ll explain what causes oxidation, compare DIY vs. professional services, outline the exact restoration steps, and share how to keep lenses clear longer. We’ll also point you to a trusted local resource for headlight restoration in Brea, CA.
Why Headlight Restoration Matters
Modern headlights are made from lightweight, impact-resistant polycarbonate. Automakers apply a protective UV coating at the factory, but that layer gradually breaks down. Once it fails, UV rays oxidize the surface, turning clear lenses milky or yellow. The result is scattered light, a hotter-running bulb, and a dimmer, poorly focused beam pattern.
Restoring lenses does more than make your vehicle look newer. Clearer lenses help your lamps project a sharper cutoff and brighter foreground—the difference you feel when you spot lane markings, road debris, or pedestrians just a bit earlier. That extra clarity translates to a calmer night drive and a safer commute.
DIY vs. Professional Headlight Restoration
DIY Kits: When They Work—and When They Don’t
Off-the-shelf kits can improve lightly hazed lenses. They typically include abrasives, a polish, and a wipe-on protectant. If oxidation is superficial, you may see a noticeable boost. However, wipe-on sealants rarely match the durability of a professionally applied UV-stable coating. Without a strong topcoat, lenses often re-haze more quickly—sometimes within months—especially under Southern California sun.
Professional Service: Better Optics, Longer Protection
Quality shops follow a measured process: progressive wet sanding to remove degraded plastic; machine polishing to refine clarity; then a high-solids, UV-resistant clear coat or cured sealant to lock in the result. The coating choice matters. Professional-grade urethane clear coats with UV absorbers or ceramic-fortified layers resist yellowing and pitting far longer than most consumer kits. You’ll generally get more uniform clarity, better beam focus, and multi-year longevity when the job is done correctly.
If you’re in North Orange County and want the professional route, consider scheduling with a local expert. For example, you can book headlight restoration at Brea Auto Body to restore performance and appearance in one visit.
The Professional Headlight Restoration Process
While exact methods vary by shop and lens condition, a thorough restoration usually includes the following stages.
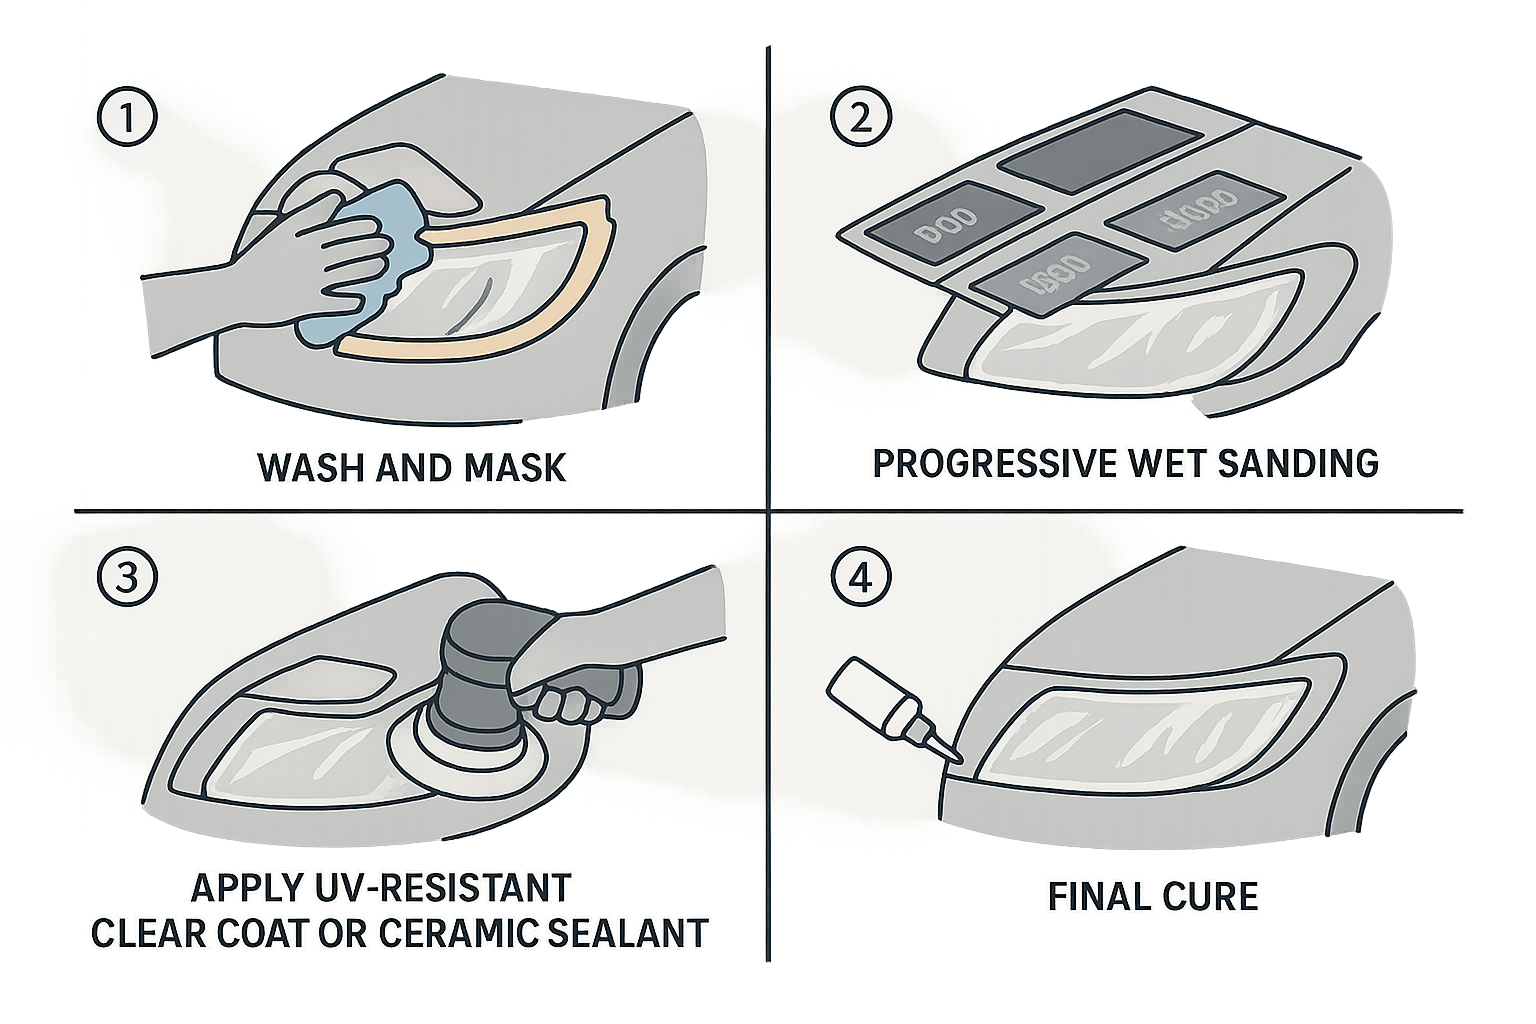
From sanding to UV coating, these steps return lenses to optical clarity.
1) Clean and Mask
The technician degreases the lens and masks paintwork and trim to protect adjacent surfaces. Proper masking prevents accidental marring during sanding and polishing.
2) Controlled Material Removal
Using wet sanding in stages (for example, 800 to 3000 grit), the oxidized layer is gradually removed. Progression is key—coarser abrasives level damage, while finer papers refine the surface to a uniform, foggy finish ready for polishing.
3) Polishing to Optical Clarity
A rotary or dual-action polisher with a plastic-safe compound removes micro-scratches, revealing a transparent surface. The technician monitors heat and pressure to avoid distortion.
4) UV-Stable Topcoat
The restored lens is sealed with a UV-resistant clear coat or a high-grade ceramic layer designed specifically for polycarbonate. This step is the barrier that keeps oxidation at bay, providing durable clarity in California’s sun.
5) Cure and Quality Check
Depending on the coating, curing may involve time, heat, or UV exposure. A final inspection verifies clarity, uniformity, and beam focus alignment.
How Long Does Headlight Restoration Last?
Longevity depends on three variables: the severity of damage, the thoroughness of surface preparation, and the quality of the protective topcoat. When a professional-grade UV clear is applied over properly leveled and polished lenses, results can last years with normal driving and routine care. In contrast, wipe-on DIY protectants may need frequent reapplication.
If your vehicle spends its days outside, consider a parking strategy that reduces UV exposure, such as shaded parking when available. Simple habits extend the coating’s life and keep your beam crisp.
Cost, Value, and When Replacement Makes Sense
Restoration typically costs a fraction of full headlamp replacement—especially for vehicles with complex housings or adaptive lighting. It’s a smart way to refresh your car before a sale or lease turn-in, and it often prevents premature bulb upgrades or ballast changes done to compensate for cloudy lenses. However, if the lens is cracked, deeply pitted, or delaminating from the housing, replacement may be the right call. A reputable shop will evaluate and recommend the most cost-effective route.
Before and After: What a Quality Result Looks Like
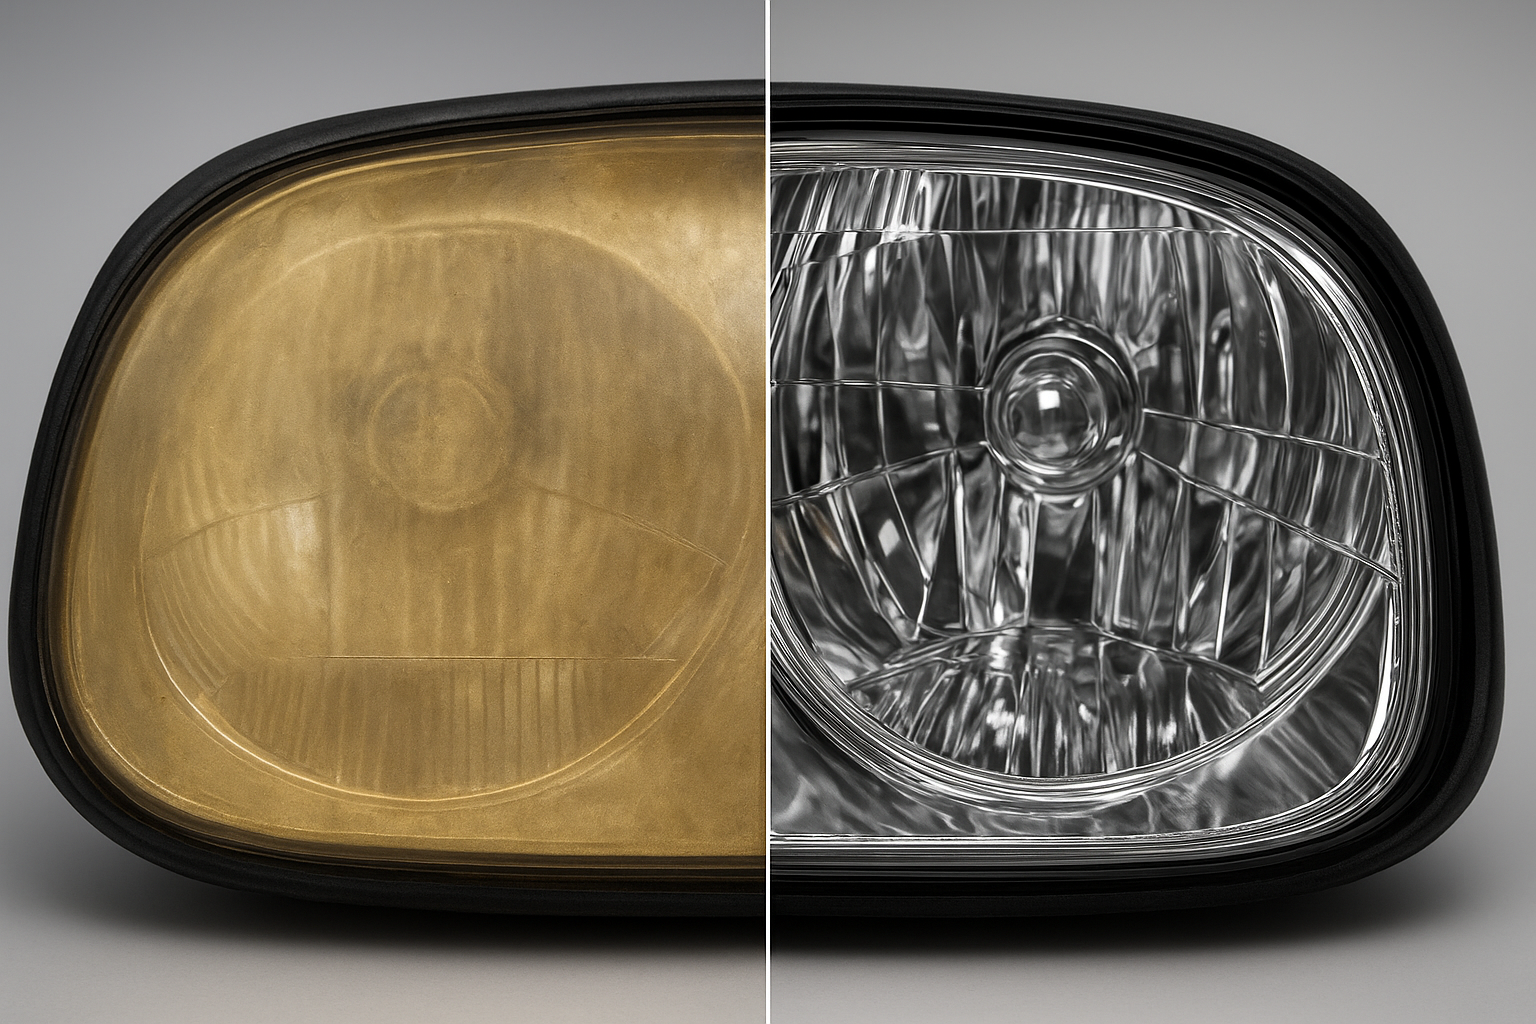
A proper restoration removes oxidation and restores a clear, sharply focused lens.
After a thorough restoration, the lens should appear uniformly clear with no cloudy patches or sanding haze. At night, you’ll notice a sharper cutoff and more even illumination, not just a brighter hotspot. If you still see streaking or haloing, ask your technician about additional refinement or alignment checks.
Aftercare: Keep Your Headlights Clear Longer
After headlight restoration, treat lenses like you would fine paint. Wash with a pH-balanced shampoo, avoid harsh solvents, and top with a sealant compatible with the professional coating your shop used. If your vehicle lives outdoors, a quarterly hand-applied, plastic-safe sealant provides an extra UV buffer. Most importantly, don’t use abrasive scouring pads or household cleaners—these can scratch the surface and shorten coating life.
Regular inspections help too. If you notice water spots, bug acids, or bird droppings, rinse them promptly to prevent etching. Consistency—not intensity—wins the longevity battle.
Choosing the Right Headlight Restoration Shop in Brea
Look for a process that emphasizes surface leveling, controlled polishing, and a UV-cured or catalyzed clear coat specifically formulated for polycarbonate. Ask what grits and polishes they use, how they control heat during polishing, and what warranty they provide on the coating. Shops that work with modern refinish systems and document their steps typically deliver the most durable outcomes.
Local convenience matters, too. A shop that can restore headlights while handling other cosmetic repairs or touch-ups saves you time and ensures a consistent finish. If you’re nearby, Brea Auto Body’s headlight restoration service is a practical option with easy access from the 57 and 91 corridors.
Quick Answers to Common Headlight Restoration Questions
Will restoration fix internal moisture or cracks?
No. Restoration addresses exterior oxidation. Moisture inside the housing, broken seals, or cracked lenses require repair or replacement.
Can I upgrade bulbs instead?
Brighter bulbs won’t solve scatter from cloudy lenses and may increase glare. Start with clear lenses, then evaluate bulb or aim adjustments if needed.
How long does the service take?
Most professional headlight restoration jobs finish the same day. Cure time for advanced coatings can add a short waiting period before washing the vehicle.
Ready for Clearer Night Driving?
Headlight restoration is a fast, cost-effective way to upgrade safety and appearance. If you’re in Brea or North Orange County and want it done right the first time, schedule your headlight restoration with Brea Auto Body today.

